Tuesday, July 9, 2013

The journey- life together-ish

I'm still here.  In my 4th week of being a med student's wife.  The days are long and the nights are rough and every night I have to tell myself it isn't for forever.  See, me and my hubster- we are tight.  Always have been. We grew up together. His dad, while we were in high school would call him " that Wheeler kid" ( my maiden name)  because we were always together.  I enjoy my life with him- we laugh about so much, discuss great topics- we do life together.  
So now I sit here -without him -and am tempted to dwell on that. But the thing is- I know that Tim was made for this.  And I, being his lifetime, forever, do life together, go- to girl didn't support him- I would feel responsible for not letting Tim be what he was made for.  God is so good and so faithful- I am confident that he put this in our hearts and wouldn't set us up for failure.  I am somewhat looking forward to deepening my walk with Jesus. And I say somewhat because I know that hard times are ahead- and who really wants hard times?  But my past tells me that in these times God's presence is all the sweeter.  "Count it all joy, my brothers, when you meet trials of various kinds, for you know that the testing of your faith produces steadfastness. And let steadfastness have its full effect, that you may be perfect and complete, lacking in nothing." (James 1:2-4 ESV). That "steadfastness" bit sounds great.  I pray I can be the woman my boys will remember as a woman who was unshaken in her faith, clinging to God's Word and praying continually.  

By God's grace- a little less crazy.
Beth


Friday, May 10, 2013

Beware of the Croc

Crocs.  Have these sly devils around and you are dabblin' in dangerous waters!  They lie, waiting patiently to chomp on your foot and never let go.  I live in Iowa and they are everywhere around here! You haven't heard of Crocs in Iowa?! Look down and you'll see the poured, soft, plastic kind that fits your foot quite nicely and is a dismal addition to your fashion wardrobe.  You didn't think I meant the green, scaly variety did you? I live in Iowa, ya know ;)

Don't get me wrong- I am about the last person to really put a lot of time into how I look on the average weekday-- but here is what I have observed from my friends that seem to have an organized life.  They don't wear crocs. Ever.

You know how the saying goes "Dress for the job you want."  Well, the mom's motto goes more like this "Dress for the attitude you want."  If I don't get out of my pajamas and leave slippers or socks on all day-- I just never get much done.  And my crocs at the door are there to slip on quick to take a stinky diaper out or run some trash out...but then they come off once I get in the door and I am back to the lounge-around attitude.  But let's contrast that with right-away getting dressed, brushing my hair and teeth, getting my sunscreen on and then putting on my shoes that compliment my outfit-- be it Bobs or cute flats or most likely tennis shoes--what a better start to my day!  I am ready to get things done- and I do!  I love it when I look at the clock and by 9:00am everyone has clothes on, beds made and breakfast put away!  It allows me the freedom to play with my kids instead of feeling like I need to clean all morning.

It might sound like I am anti-croc.  Which isn't the case- this all-boy-mom finds them quite handy to go frog and worm hunting and making mud pies. Crocs have their place.

So this takes a little thinking ahead (I didn't say planning, cause that sounds like too much work!)
My goal is to make my morning as efficient as possible. My new plan is to figure out what I am wearing before I go to bed- all the way down to the shoes!  That way, when my alarm goes off the kids get me up in the morning, I already know what I am wearing. After putting this into practice for a couple weeks- I am loving myself more because I am less likely to waste away my day!  I used to think that since I wasn't leaving the house and only the Hubster was going to see me, I didn't need to get dressed.  I can't say I am ever feeling like I can really rock the croc look either.  If there was anybody in the world that I should care how they see me- it should be my Hubster!  Afterall- we were made to do life together- and who wants to do life with a ho-hum slob?  I don't! Of course, I still have my days where I am behind in laundry or I am just not fitting into my jeans so sweatpants/yoga pants still make an apperance. And on those days- putting the running shoes on is a must!

So here is to hopefully a new, lasting habit of some great shoe choices in the beginning of my day!
A little less crazy!
Beth
Found this at Hobby Lobby the day I wrote my draft for this post :)


Wednesday, April 17, 2013

Homemade Baby Wipes


After my first was born, I had started to have some trouble with a weird rash on my ring finger.  I had gone to the doctor and then referred on to the dermatologist and spent lots of money in creams and lotions to get it to go away. But it didn't get better...just kept spreading farther down my finger. Yuck.  One day my in-laws came by with a steal of a deal on Pampers Sensitive Skin Baby Wipes.   I started using them and a couple weeks in noticed my finger was getting better.  Turns out, I am the one with sensitive skin- not the baby.

Instead of buying these wipes- I started making my own.  And it is SO EASY.

First gather the goods.


The container I found at Target in the kitchen storage isle and it perfect for wipes.  It has a one hand release, air tight, and just the right size.


Take your roll of paper towels and cut it in half with a serrated knife (or have the Hubster use his power tools and cut it for you!)


* I really like the Bounty Select-a-Size the best.  They hold up really well- the the Select a Size makes for the right size wipe.  I always buy these on sale and with a coupon.

Put the cut side down and leave the cardboard center in it for now.


In a 2 cup liquid measuring cup- fill with warm water to just under 2 cups.
* I find that 2 cups on the nose is too much water


Add 2 Tablespoons oil and 2 Tablespoons Baby wash and stir gently.
*Oil- I like to use coconut or mineral oil aka baby oil
*Baby wash- any brand you like (or find on sale!)
*If you measure the oil first the soap slips right out of the measuring spoon


Pour mixture evenly over paper towels and let sit for at least 5 minutes (or until you have to use them next)


Once it has had a chance to soak through- grab the cardboard center and pull it out


To use your wipes, pull from the center.


This takes me less than five minutes to do.  I have my Hubster cut up a bunch of towels at once for me and then I keep them in a tote in the Babe's closet.  I also keep a tube of diaper cream in with the wipes just so I always have it!

At A Glance

Materials:

  • air-tight container 1.5 qt. 
  • select-a-size paper towels
  • oil for skin
  • baby wash
Directions:
1. Cut paper towels in half and place cut-side down in container
2. In a 2 cup liquid measuring cup fill to 1 3/4 cup with warm water
3. Add 2 T. of oil
4. Add 2 T. of baby wash
5. stir gently
6. Pour evenly over paper towel and let sit
7. After water has soaked the roll, pull cardboard center out
8. Pull wipes from center to use

** If you can't find a container that fits- you can still make the wipes by putting this together in a large mixing bowl and then storing in a gallon zip-lock bag.  


The Math


Monday, April 8, 2013

'Carpet' Diem!

Once upon a time we bought a house (June 2010).  It was a small house- but it had a basement.  We thought to ourselves- "hey we can remodel the basement all by ourselves and save so much money!" 2011 we started the major overhaul starting from scratch.

I have hoped, dreamed, cried, stayed up all hours of the night and spent every last penny on finishing our basement.  I have longed for the day that I can send the boys downstairs to play, to be able to invite my middle school small group over for a girls' night, movie nights, birthday parties and so on.  And it is here. But the funny thing is...I am not as thrilled as I thought I would be. Oh, I love how it looks and am so proud of The Hubster!  Getting this carpet in means now it is my turn to take over the basment progress! Yikes!
Now all of my dreams of decorating, organizing, and furnishing has to turn into a reality. It is time for me to put all my creative skills and design eye to work- and make this space functional, reflect my style, and spend as little money as possible!  I see lots of garage sales and Goodwill trips in my very near future.

The plans for these spaces include a bookcase door, built-in toy storage, lego shelves, lighted display shelves, rescued furniture, chandelier light fixture, zebra wall... and so on.  I can't wait for it to be all done!

Feels a bit daunting.. but I'll get there eventually!

A little less crazy?
Beth


Friday, April 5, 2013

You Don't Need a Window to Hang a Curtain

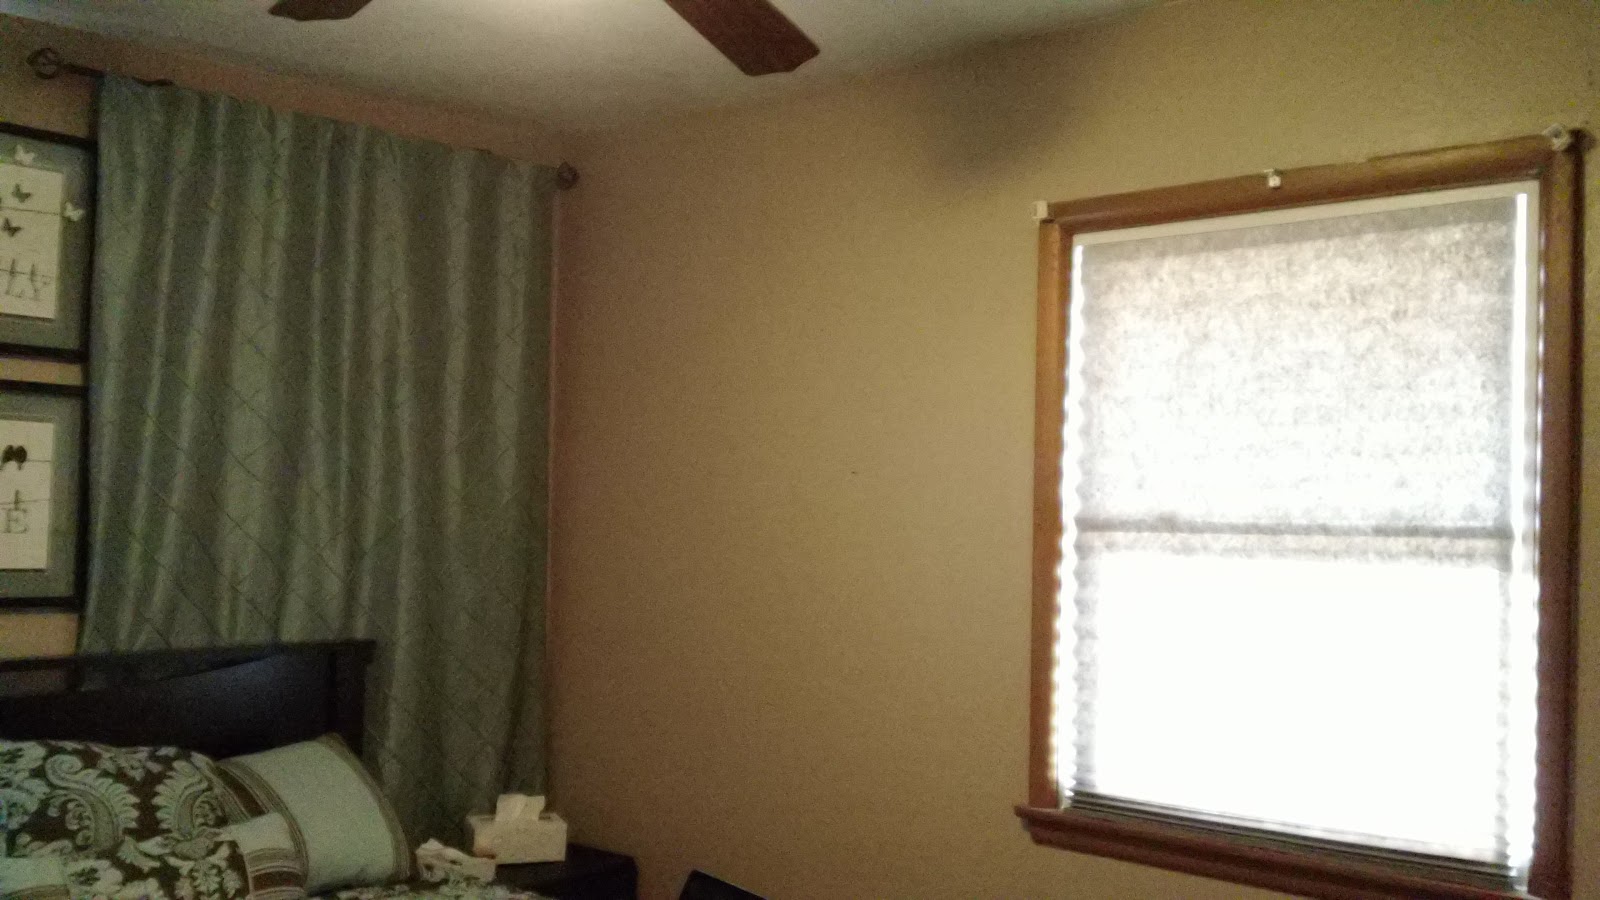
My bedroom has not had an ounce of love given it... let's be clear, I am speaking of the actual bedroom itself (I do have 4 kids in 5 years.. ;)  We have lived in this house for 3 years and 2 of them have been spent remodeling and water proofing our basement (or the "stupid basement" as I have come to call it)  What a nightmare - but more on that in a later post!  Everything else in the house (as far as decorating goes) has been put on hold. Picture frames that were hung in our previous home were hung on existing nails in this home--super lame.  But finally- I have started to show some love to the upstairs and what a difference!  So back to the bedroom.  I made a simple change.  Here is what I started with.
Super bare and not balanced. 

Part of my trouble in this tiny bedroom is the windows are in awkward spots.  My other trouble-it is tiny.  I can't put my bed anywhere that looks good with the two windows and allows space to move around.  

So I sat in my room with my sketch pad for a while trying to think of what I could do to make this look more balanced.  

I came up with:
  • taking down curtain and moving it behind my bed adjacent to existing curtain
  • hanging the curtains high
  • adding some sort of artwork
  • adding a paper shade to the to-be-bear window.
I talked my Hubby into taking a break from the basement and helping me hang both the curtains high and on the same wall.  He was skeptical-- thinking it would look dumb to have a curtain over just a wall.  But I assured him I was on to something great.  :)

So here it is finished!
Higher curtains, nice and balanced
 (pay no attention to the painting on the left side- I don't want to take it down until it has a safe place to go!)

You'll notice I have two pieces of fantastic artwork right down the middle.  I was originally going to hang a mirror...then thought it was just too heavy for the space.  Then I was trying to figure what I could make to fill the space.  But on a shopping trip to Younkers during their Goodwill Sale- I happened upon these two lovelies you see!  They were 50% off and the I got an extra 25% off with my coupon and signed up for a credit card (which I will promptly cancel...)  for an extra 20%!  That made these about two pictures $40- not too shabby.  I don't think I could have made that for cheaper.  

On the other window I decided to put a "temporary" shade.  Cost me all of $5 and- let's be honest- it isn't so temporary.  I will keep thinking of what can replace it- but it is low on the list of to-dos! Unless I find an amazing deal on a shade..I am quite happy with the paper.


I love, love, love the end result.  My room feels bigger and more grand! When I go in my room I feel a little more relaxed and want to be in there. I enjoy the space and like to be in it.  And that, folks, is important!  A happy and rested mommy is key to organizing crazy!  And this start on my bedroom only cost me $45!

I have lots more to do in this space- finding bedside tables, refinishing our dressers, making a mirror, hanging my jewelry... and on the list goes.  But this is a pretty great start!

What kind of spaces do you have that just stress you out to be in?  Is it possible to rearrange something to give it a bigger feel? Let me hear your ideas! I have other rooms that need some inspiration! 

A little less crazy,
Beth


Thursday, April 4, 2013

Homemade Laundry Detergent


In my quest to live as inexpensively as possible I have experimented with different homemade cleaners. There is some money to be saved here! Vinegar, water, hydrogen peroxide, and baking soda make up the bulk of my cleaning supplies.  When it comes to the laundry, I like to make this too!  Let me show you why!

In my house of 6 I will easily do 10-12 loads in a week.  At Sam's Club I can buy 146 loads of Tide Original for $25.48.  That translates to $0.17 per load or $8.16 each month.  With my homemade variety I can make a batch (48 loads) for about $3.00 which equals $0.06 per load or $3.00 each month!
Now this homemade detergent - it is no miracle detergent or anything-- but for the bulk of my laundry, it does just fine. My clothes come out clean- smelling and looking great! For the mud, blood, grass, or food stains, I spray it with a pre-treat or smear a little baking soda or washing soda paste first. And sometimes I like to have a scent to my wash so I might add some Washer Whiffs by Scentsy or some essential oils that I use in my cleaners.


Here is my recipe;
1 cup Borax
1 cup Washing Soda
4 oz any bar soap


Here is how I did it:

I grabbed the goods from my seriously dusty basement (still in the remodeling process- just finished drywall!!)

  • Borax
  • Washing Soda
  • Bar Soap ( I got these samples from a dermatology clinic- they gave me the whole box!)


I shredded my bar soap with my food processor.
I then mix all ingredients together and put it back through the food processor. This makes it into a nice powder.  Without this step- I ended up with larger pieces of soap that wouldn't always dissolve in my cold water loads (ending up as white pieces on my dark clothes).

I love to add some smelly stuff some of my loads since it is otherwise fragrance free.  Scentsy makes a great add in... And I might know someone who sells it...uh hem... Me... Or you can use some essential oils. Both work great!

Once you have it made- make a trip to the dollar store and get a glass jar that is air tight! (This has been on my to-do list for weeks! ...and mine is starting to get clumpy from not being covered...shame). 


This whole process takes me about 30 minutes start to finish (because as it goes in my house of crazy I inevitably have to wipe two bottoms, clean up some spilled water my 2-year-old helped himself to, and watch the next "cool trick" my little superheros came up with ) but I think a home with less crazy could do it in 15-20 minutes.

For a large load- I use one tablespoon.  If the load is extra dirty (we have been doing home renovation) I add a little more and spot treat stains with a paste of baking soda or washing soda...which ever is closest.   


At A Glance

Tide           vs.    Homemade
$.17/load            $.06/load

Recipe
1 cup Borax
1 cup Washing Soda
4 oz. bar soap any variety- grated
Container(s)

1. Shred soap
2. Add borax, washing soda and shredded soap into a pourable bowl
3. Put it back through the food processor 
4. Store in air tight container


Directions for use:
1 T. for a large load
Heaping Tablespoon for heavily soiled loads( spot treat stains)


I have found Borax and Washing Soda on Amazon in a bundle for about $20.  Or support your local store and get to making some Homemade Laundry Detergent!!  If you gave this recipe a try or have a recipe for homemade detergent that you love- let me hear about it!

A little less crazy,
Beth